UITableView の編集モード
UITableView は編集モードを実装していて、簡単に行の並べ替えや削除ができるようになっています。
前回作成したプログラムを少し改造して、次のように行の編集ができるようにしましょう。
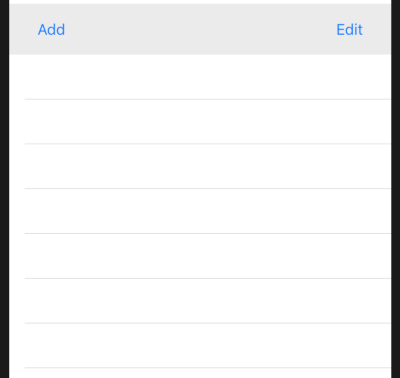
ここで作る画面は次のようになります。前回ヘッダーとして確保していた View にボタンを二つ追加しています。
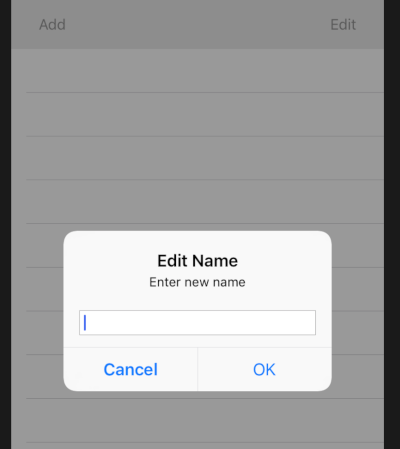
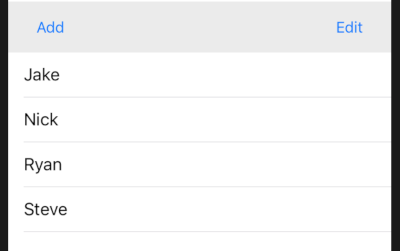
行の追加は、左上の Add ボタンをタップすることで、ポップアップが出て入力を促します。
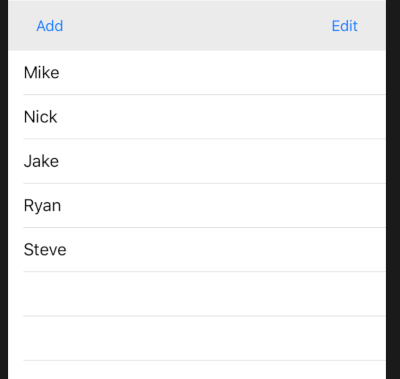
いくつか入力すると、次のような画面になります。
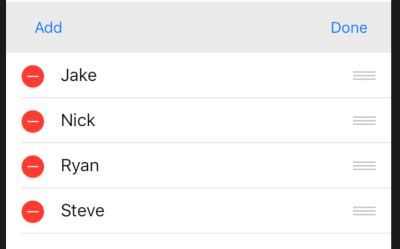
右上の Edit ボタンをタップすると、テーブルビューの編集モードになります。このとき Edit ボタンの表示を Done (終了) に書き換えます。
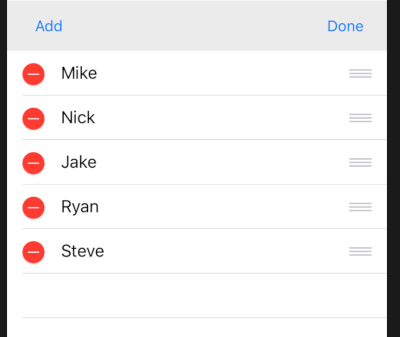
左側の赤丸アイコンをタップすると・・・
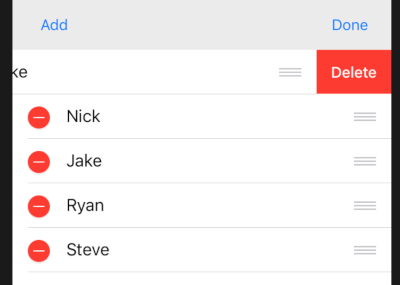
データの削除の確認の Delete ボタンが表示されるので、これをタップするとデータが削除されます。
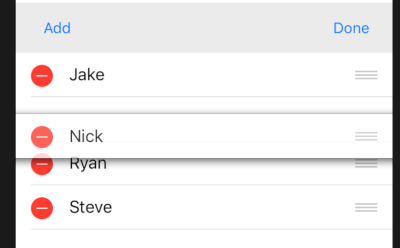
行の右側になるハンドルをドラッグすると、行を上下に並べ替えることができます。
ドラッグを終えたところで、順番が確定します。
左上の Done ボタンをタップすると、編集モードが終了します。
プログラムのポイントとしては、上のようなユーザーインターフェイスをどのように実現するか、という点と、バックエンドのデータをどのように書き換えるか、というところがポイントになります。
データモデルの変更
「UITableView の基本」からの変更箇所を主に記載します。 Person クラスやPersonList クラスについては、同様なので前回の記事をみてください。
データストアオブジェクトの実装例は次のようになります。追加、削除、順番の入替えに対応したメソッドが追加実装されています。
import Foundation

final class PersonStore {

    static let shared = PersonStore()
    private var personList: PersonList!

    let dataUrl: URL = {
        let url = FileManager.default.urls(
            for: .documentDirectory, in: .userDomainMask).first!
        let dataUrl = url.appendingPathComponent("data.json")
        return dataUrl
    }()

    private init(){
        load()
    }

    func count() -> Int {
        return personList.list.count
    }

    func add(_ p:Person) {
        personList.list.append(p)
    }

    func remove(_ index:Int) {
        personList.list.remove(at: index)
    }

    func get(index i: Int)->Person {
        return personList.list[i]
    }

    func move(from i: Int, to j: Int) {
        let p = get(index: i)
        personList.list.remove(at: i)
        personList.list.insert(p, at: j)
    }

    func load(){
        if
            let data = try? Data(contentsOf: dataUrl),
            let list = try? JSONDecoder().decode(PersonList.self, from: data) {
            self.personList = list
        } else {
            self.personList = PersonList()
        }
    }

    func save() throws {
        let data = try JSONEncoder().encode(personList)
        try data.write(to: dataUrl)
    }
}
また、データを JSON エンコードして、ファイルに保存して次回アプリ起動時に、前回入力したデータが読み込まれるようにしてあります。
JSON ファイルへのオブジェクトの保存については 「オブジェクトの JSON 形式ファイルへのエンコードとデコード」をみてください。
ビューとビューコントローラの作成
ストーリーボード、アウトレット、アクション
ユーザーインターフェイスはストーリーボードで次のようにします。
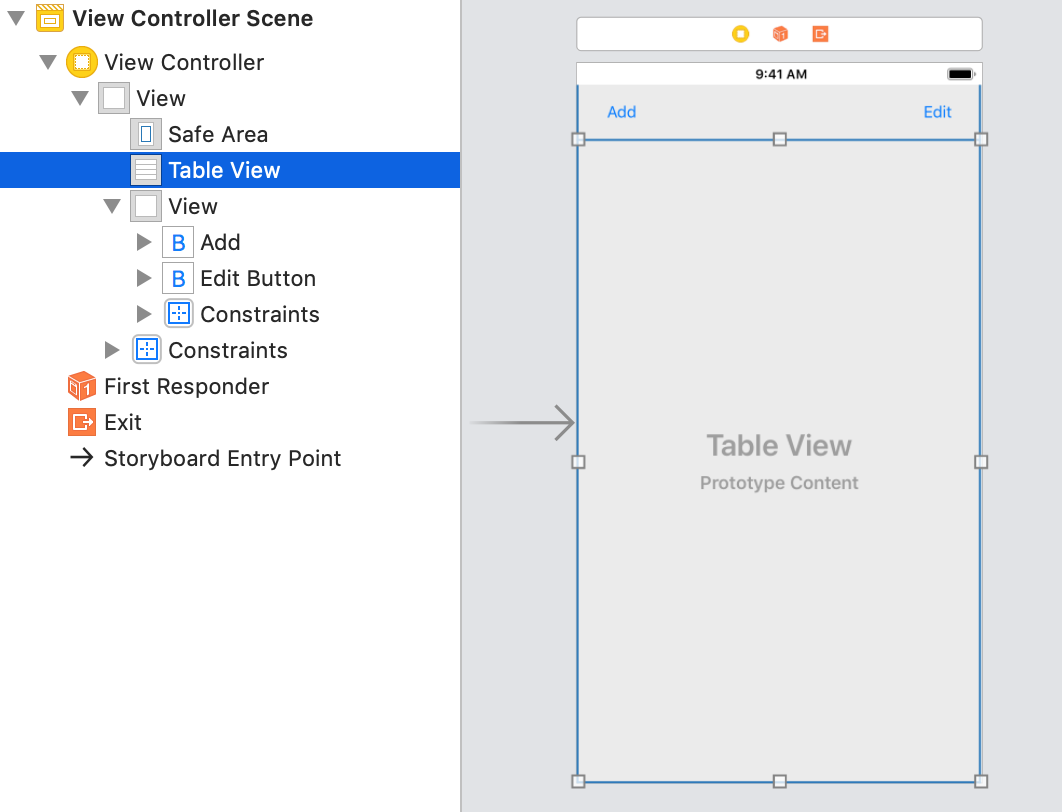
ベースになっているのは UIView で、そのサブビューとして上部に UIView (さらにそのサブビューとしてボタン二つ)、下部に UITableView が配置されています。
アウトレットは UITableView に対して tableView、Edit ボタンを editButton としています。
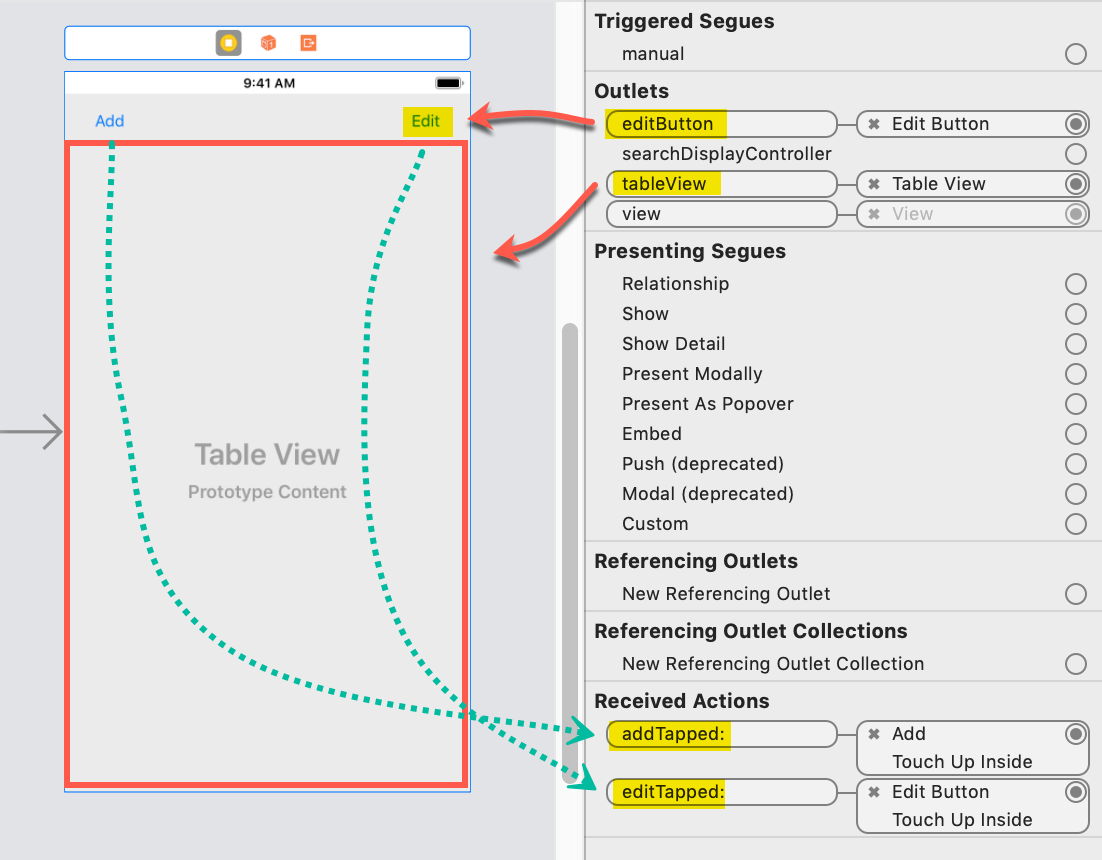
アクションは、Add ボタン、Edit ボタン、それぞれに対して、addTapped、editTapped としています。
具体的な全体のコードはこのページの下の方に記載します。まずは部分的に説明します。
データの追加
まずは Add ボタンをタップして、ポップアップを表示して、データを受け付けるところからみていきます。
ポップアップを表示してデータ入力を促す基本的な方法については、「ポップアップでテキスト入力を受取る方法」をみてください。ここではテーブルビューの扱いに関わるところをみます。
ポイントは、データを追加した後に UITableView の reloadData() メソッドを呼び、UITableView にデータの変更があったことを知らせるところです。これによって、テーブルがデータを再読み込みします。
@IBAction func addTapped(_ sender: Any) {
    var alertTextField: UITextField?

    let alert = UIAlertController(
        title: "Edit Name",
        message: "Enter new name",
        preferredStyle: UIAlertController.Style.alert)
    alert.addTextField(
        configurationHandler: {(textField: UITextField!) in
            alertTextField = textField
    })
    alert.addAction(
        UIAlertAction(
            title: "Cancel",
            style: UIAlertAction.Style.cancel,
            handler: nil))
    alert.addAction(
        UIAlertAction(
            title: "OK",
            style: UIAlertAction.Style.default) { _ in
                if let text = alertTextField?.text {
                    PersonStore.shared.add(Person(text))
                    try? PersonStore.shared.save()
                    self.tableView.reloadData()
                }
        }
    )

    self.present(alert, animated: true, completion: nil)
}
この部分は UITablewView を編集モードにしなくてもできます。
UITablewViewDelegate をコンフォーム
UITableView のデリゲートを、ビューコントローラそのものに指定するので、ビューコントローラで UITableViewDelegate プロトコルをコンフォームします。
import UIKit

class ViewController: UIViewController, UITableViewDataSource, UITableViewDelegate {

    let cellIdentifier = "UITableViewCell"

    @IBOutlet weak var tableView: UITableView!
    @IBOutlet weak var editButton: UIButton!

    override func viewDidLoad() {
        super.viewDidLoad()

        tableView.register(UITableViewCell.self, forCellReuseIdentifier: cellIdentifier)
        tableView.delegate = self
        tableView.dataSource = self
    }
    ...
UITableView の編集をサポートするビューコントローラ
次に削除を実行する箇所をみてみましょう。
削除する行を選択するための赤丸は、編集モードにしたときに表示されます。 UITableView を編集モードにするには、UITableView の setEditing(_:animated:) メソッドに true または false を渡して呼び出します。編集モードに移行または通常モードに戻る時にアニメーションを実行するには animated を true にします。
現在の編集モードの状態は isEditing プロパティでチェックできます。
@IBAction func editTapped(_ sender: Any) {
    if(tableView.isEditing){
        tableView.setEditing(false, animated: true)
        editButton.setTitle("Edit", for: .normal)
        try? PersonStore.shared.save()
    } else {
        tableView.setEditing(true, animated: true)
        editButton.setTitle("Done", for: .normal)
    }
}

func tableView(
    _ tableView: UITableView,
    commit editingStyle: UITableViewCell.EditingStyle,
    forRowAt indexPath: IndexPath) {

    if editingStyle == .delete {
        PersonStore.shared.remove(indexPath.row)
        tableView.reloadData()
    }
}
Delete を選択した時には tableView(_:commit:forRowAt:) が呼ばれます。 このときに commit に削除を示す UITableViewCell.EditingStyle.delete が渡されます。
また、選択された行番号は forRowAt に渡されます。
データを行に表示されているのと同様な順番の配列で保持すると、「3行目の Delete がタップされた」ときに、 配列のインデックス 2 (=3-1) のデータを消せば良い、とすぐにわかるので便利です。
行の順番の入れ替え
行をドラッグして入れ替えるなど、一見してややこしそうですが、UITableView を使えば実装は簡単です。
UITableView を編集モードにすることに加えて、tableView(_:moveRowAt:to:) を実装すれば自動的にドラッグ用のツマミが表示されます。
func tableView(
    _ tableView: UITableView,
    moveRowAt sourceIndexPath: IndexPath,
    to destinationIndexPath: IndexPath) {

    PersonStore.shared.move(
        from: sourceIndexPath.row,
        to: destinationIndexPath.row)
}
どの行 (moveRowAt) を、どこに (to) 移動したか、tableView(_:moveRowAt:to:) メソッドに渡されて呼ばれるので、 それに合わせて、データストアを更新します。
その他のソースコード
前回の記事から発展させて書いたので、念の為全体を記載しておきます。
AppDelegate.swift
今回はデータをハードコードしないので、シンプルになってます。
import UIKit

@UIApplicationMain
class AppDelegate: UIResponder, UIApplicationDelegate {

    var window: UIWindow?

    func application(_ application: UIApplication, didFinishLaunchingWithOptions launchOptions: [UIApplication.LaunchOptionsKey: Any]?) -> Bool {
        return true
    }
}
ViewController.swift
import UIKit

class ViewController: UIViewController, UITableViewDataSource, UITableViewDelegate {

    let cellIdentifier = "UITableViewCell"

    @IBOutlet weak var tableView: UITableView!
    @IBOutlet weak var editButton: UIButton!

    override func viewDidLoad() {
        super.viewDidLoad()

        tableView.register(UITableViewCell.self, forCellReuseIdentifier: cellIdentifier)
        tableView.delegate = self
        tableView.dataSource = self
    }

    @IBAction func addTapped(_ sender: Any) {
        var alertTextField: UITextField?

        let alert = UIAlertController(
            title: "Edit Name",
            message: "Enter new name",
            preferredStyle: UIAlertController.Style.alert)
        alert.addTextField(
            configurationHandler: {(textField: UITextField!) in
                alertTextField = textField
        })
        alert.addAction(
            UIAlertAction(
                title: "Cancel",
                style: UIAlertAction.Style.cancel,
                handler: nil))
        alert.addAction(
            UIAlertAction(
                title: "OK",
                style: UIAlertAction.Style.default) { _ in
                    if let text = alertTextField?.text {
                        PersonStore.shared.add(Person(text))
                        try? PersonStore.shared.save()
                        self.tableView.reloadData()
                    }
            }
        )

        self.present(alert, animated: true, completion: nil)
    }

    @IBAction func editTapped(_ sender: Any) {

        if(tableView.isEditing){
            tableView.setEditing(false, animated: true)
            editButton.setTitle("Edit", for: .normal)
            try? PersonStore.shared.save()
        } else {
            tableView.setEditing(true, animated: true)
            editButton.setTitle("Done", for: .normal)
        }

    }

    // MARK: - TableView DataSource Delegate

    func tableView(
        _ tableView: UITableView,
        numberOfRowsInSection section: Int) -> Int {

        return PersonStore.shared.count()
    }

    func tableView(
        _ tableView: UITableView,
        cellForRowAt indexPath: IndexPath) -> UITableViewCell {

        let cell = tableView.dequeueReusableCell(
            withIdentifier: cellIdentifier,
            for: indexPath)
        let p = PersonStore.shared.get(index: indexPath.row)
        cell.textLabel!.text = p.name
        return cell
    }

    // MARK: - TablewView Delegate

    func tableView(
        _ tableView: UITableView,
        commit editingStyle: UITableViewCell.EditingStyle,
        forRowAt indexPath: IndexPath) {

        if editingStyle == .delete {
            PersonStore.shared.remove(indexPath.row)
            tableView.reloadData()
        }
    }

    func tableView(
        _ tableView: UITableView,
        moveRowAt sourceIndexPath: IndexPath,
        to destinationIndexPath: IndexPath) {

        PersonStore.shared.move(
            from: sourceIndexPath.row,
            to: destinationIndexPath.row)

    }

}
以上、ここでは UITableView の基本的な編集機能の使い方について説明しました。