Swift でリアルタイム音声認識をするサンプルコード
この記事では iOS の音声認識機能 (Speech Recognition) を利用する方法について説明します。プログラミング言語は Swift を用います。
iOS の音声認識機能では、録音済みの音声ファイルから文字に書き起こすこともできますし、マイクに向かって話しているのと同時に、 リアルタイムに文字に書き起こしていくこともできます。
ここではリアルタイムに、文字にしていく方法について説明します。
1. 音声認識とは?
音声認識 (Speech Recognition) というのは、人間の声をコンピュータに認識させて、言葉を文字に置き換えたりする技術のことです。
話し言葉をそのまま文字にできたら、ちょっとしたメモをとるのも素早くでき、とても便利ですね。
iOS の音声認識では、録音して保存しておいた音声ファイルをもとにして音声認識を行うことができるだけでなく、 リアルタイムにマイクからの音源をもとに順次音声認識処理を実行することが可能です。Apple の資料ではリアルタイムなマイクからの音源のことを、「ライブオーディオ (live audio)」という呼び方をしています。
ここで紹介する音声認識では、ライブオーディオによる文字の書き起こしを行います。
2. リアルタイム音声認識機能の使い方
では、さっそく簡単な音声入力アプリを作ってみましょう。
2-1. 今回のサンプルの下準備
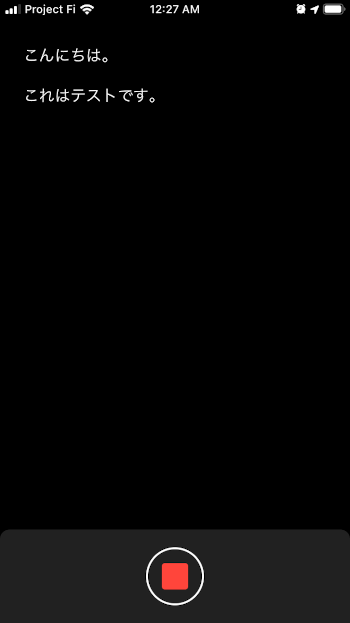
ここでは画面を次のような画面にします。
この画面で作るような丸ボタンについては、次のページで説明しています。
このページに従って画面を作成したものとして、以下の説明をします。
さらに上記の赤丸ボタンに加えて、ひとつ TextView を配置してください。
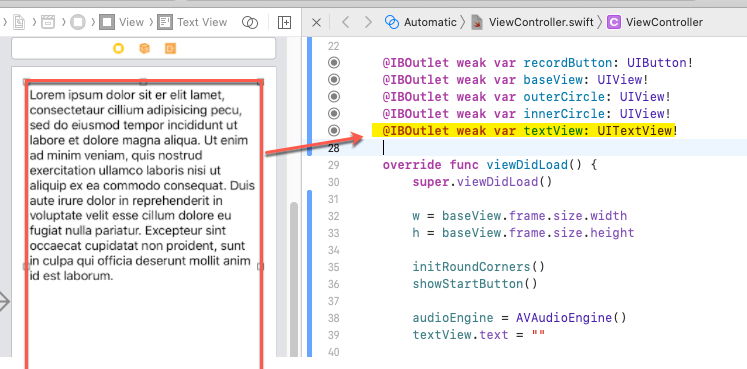
アウトレットは textView とします。
2-2. Swift での音声認識を使うサンプル
以上の準備をした上で、さきにサンプルコードの全体を示します。ViewController.swift を次のようにします。
import UIKit
import Speech
import AVFoundation

class ViewController: UIViewController {

  var isRecording = false
  var w: CGFloat = 0
  var h: CGFloat = 0
  let d: CGFloat = 50
  let l: CGFloat = 28

  let recognizer = SFSpeechRecognizer(locale: Locale.init(identifier: "ja_JP"))!
  var audioEngine: AVAudioEngine!
  var recognitionReq: SFSpeechAudioBufferRecognitionRequest?
  var recognitionTask: SFSpeechRecognitionTask?

  @IBOutlet weak var recordButton: UIButton!
  @IBOutlet weak var baseView: UIView!
  @IBOutlet weak var outerCircle: UIView!
  @IBOutlet weak var innerCircle: UIView!
  @IBOutlet weak var textView: UITextView!

  override func viewDidLoad() {
    super.viewDidLoad()

    audioEngine = AVAudioEngine()
    textView.text = ""
  }

  override func viewDidAppear(_ animated: Bool) {

    w = baseView.frame.size.width
    h = baseView.frame.size.height

    initRoundCorners()
    showStartButton()

    SFSpeechRecognizer.requestAuthorization { (authStatus) in
      DispatchQueue.main.async {
        if authStatus != SFSpeechRecognizerAuthorizationStatus.authorized {
          self.recordButton.isEnabled = false
          self.recordButton.backgroundColor = #colorLiteral(red: 0.501960814, green: 0.501960814, blue: 0.501960814, alpha: 1)
        }
      }
    }
  }

  func stopLiveTranscription() {
    audioEngine.stop()
    audioEngine.inputNode.removeTap(onBus: 0)
    recognitionReq?.endAudio()
  }

  func startLiveTranscription() throws {

    // もし前回の音声認識タスクが実行中ならキャンセル
    if let recognitionTask = self.recognitionTask {
      recognitionTask.cancel()
      self.recognitionTask = nil
    }
    textView.text = ""

    // 音声認識リクエストの作成
    recognitionReq = SFSpeechAudioBufferRecognitionRequest()
    guard let recognitionReq = recognitionReq else {
      return
    }
    recognitionReq.shouldReportPartialResults = true

    // オーディオセッションの設定
    let audioSession = AVAudioSession.sharedInstance()
    try audioSession.setCategory(.record, mode: .measurement, options: .duckOthers)
    try audioSession.setActive(true, options: .notifyOthersOnDeactivation)
    let inputNode = audioEngine.inputNode

    // マイク入力の設定
    let recordingFormat = inputNode.outputFormat(forBus: 0)
    inputNode.installTap(onBus: 0, bufferSize: 2048, format: recordingFormat) { (buffer, time) in
      recognitionReq.append(buffer)
    }
    audioEngine.prepare()
    try audioEngine.start()

    recognitionTask = recognizer.recognitionTask(with: recognitionReq, resultHandler: { (result, error) in
      if let error = error {
        print("\(error)")
      } else {
        DispatchQueue.main.async {
          self.textView.text = result?.bestTranscription.formattedString
        }
      }
    })
  }

  @IBAction func recordButtonTapped(_ sender: Any) {
    if isRecording {
      UIView.animate(withDuration: 0.2) {
        self.showStartButton()
      }
      stopLiveTranscription()
    } else {
      UIView.animate(withDuration: 0.2) {
        self.showStopButton()
      }
      try! startLiveTranscription()
    }
    isRecording = !isRecording
  }

  func initRoundCorners(){
    recordButton.layer.masksToBounds = true

    baseView.layer.masksToBounds = true
    baseView.layer.cornerRadius = 10
    baseView.layer.maskedCorners = [.layerMaxXMinYCorner, .layerMinXMinYCorner]

    outerCircle.layer.masksToBounds = true
    outerCircle.layer.cornerRadius = 31
    outerCircle.backgroundColor = #colorLiteral(red: 1, green: 1, blue: 1, alpha: 1)

    innerCircle.layer.masksToBounds = true
    innerCircle.layer.cornerRadius = 29
    innerCircle.backgroundColor = #colorLiteral(red: 0.1298420429, green: 0.1298461258, blue: 0.1298439503, alpha: 1)
  }

  func showStartButton() {
    recordButton.frame = CGRect(x:(w-d)/2,y:(h-d)/2,width:d,height:d)
    recordButton.layer.cornerRadius = d/2
  }

  func showStopButton() {
    recordButton.frame = CGRect(x:(w-l)/2,y:(h-l)/2,width:l,height:l)
    recordButton.layer.cornerRadius = 3.0
  }
}
2-3. ライブオーディオの音声認識の説明
赤丸ボタンを準備するのにすこし手間を使っていますが、音声認識部分だけで考えるとあまりコードは多くありません。
音声認識の開始と停止
音声認識は、赤丸ボタン(以下、開始/停止ボタン) をタップした時に開始します。
recordButtonTapped メソッド内で、startLiveTranscription 関数を呼び出していますが、 それが開始地点になります。
また、音声認識の実行中にもう一度、開始/停止ボタンをタップしたら、stopLiveTranscription 関数を呼び出して音声認識を停止します。
ライブオーディオと音声認識の許可
音声認識を行うことと、ライブオーディオを使うためにマイクを使うために、Info.plist でプライバシーの設定が必要です。
Privacy - Microphone Usage Description と Privacy - Speech Recognition Usage Description のエントリを、 Info.plist に追加します。

音声認識を使う許可をユーザーに訊くのは、viewDidAppear で行っています。
SFSpeechRecognizer.requestAuthorization メソッドでプライバシーの確認を行います。
import Speech
...
  override func viewDidAppear(_ animated: Bool) {
    ...
    SFSpeechRecognizer.requestAuthorization { (authStatus) in
      DispatchQueue.main.async {
        if authStatus != SFSpeechRecognizerAuthorizationStatus.authorized {
          self.recordButton.isEnabled = false
          self.recordButton.backgroundColor = #colorLiteral(red: 0.501960814, green: 0.501960814, blue: 0.501960814, alpha: 1)
        }
      }
    }
  }
もし利用が許可されなければ、開始/停止ボタンの色をグレーに変えた上で、さらに無効にしています。
マイクの利用許可は開始/停止ボタンを押した後に自動的に行われます。
オーディオセッションの設定とマイクの利用
iOS デバイスのオーディオ機能はメディア・サービス・デーモン (media service daemon) によって制御されます。 アプリケーション側からはどのようなポリシーでオーディオを利用するかを、オーディオ・セッションを構成することによって指定します。 そのポリシーをアクティベートすることによって、メディア・サービス・デーモンと通信します。
次の箇所で、オーディオセッションを設定し、マイク入力を設定して、マイク入力からのデータバッファを音声認識リクエストを表す SFSpeechAudioBufferRecognitionRequest オブジェクトに渡しています。
// 音声認識リクエストの作成
recognitionReq = SFSpeechAudioBufferRecognitionRequest()
guard let recognitionReq = recognitionReq else {
  return
}
recognitionReq.shouldReportPartialResults = true

// オーディオセッションの設定
let audioSession = AVAudioSession.sharedInstance()
try audioSession.setCategory(.record, mode: .measurement, options: .duckOthers)
try audioSession.setActive(true, options: .notifyOthersOnDeactivation)
let inputNode = audioEngine.inputNode

// マイク入力の設定
let recordingFormat = inputNode.outputFormat(forBus: 0)
inputNode.installTap(onBus: 0, bufferSize: 2048, format: recordingFormat) { (buffer, time) in
  recognitionReq.append(buffer)
}
audioEngine.prepare()
try audioEngine.start()
以上の準備をして、SFSpeechRecognizer オブジェクトの recognitionTask 関数に、音声認識要求オブジェクト (SFSpeechAudioBufferRecognitionRequest) を渡せば、 音声認識タスクが実行されます。
音声認識タスクはバックグラウンドスレッドで実行されるので、UI を更新する時には DispatchQueue.main.async ブロックを使って、 UI スレッドに処理をディスパッチします。
なお、このようなデバイス上での音声認識処理には現在制限があって、約 1 分間の処理で自動的に停止します。
このため、このアプリの UI も 1 分間で停止状態に戻さないといけないのですが、簡略化のためそうしていません。
ちなみに、iOS の他、iPadOS 13.1、macOS 10.15 でも動作確認できました。
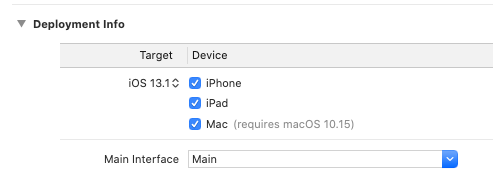
macOS 向けにビルドするには Deployment info にて Device の Mac にチェックをつけてビルドします。
Mac 上で動作している様子は次の通り。(みやすいようにフォントは大きくしました)
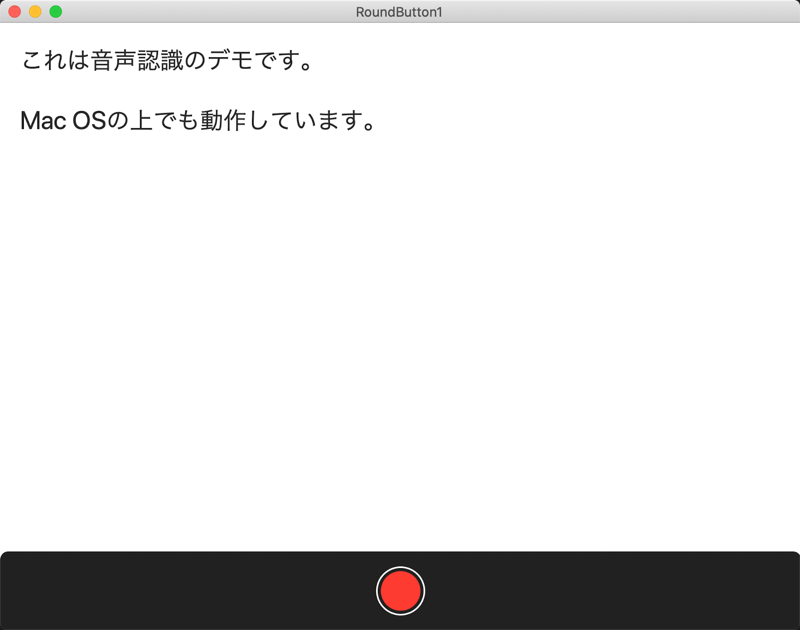
ただ、macOS 上では画面のリサイズにボタンの配置が対応していないので、その点は修正が必要になります。それはまた後ほど。
以上、ここでは iOS の音声認識機能を利用した、音声の書き起こしプログラムについて説明しました。